1.3.5 LED Bar Graph
Introduction
In this lesson, we will learn how to make lights turn on one after another on an LED Bar Graph. This is a fun and simple project for beginners!
Components
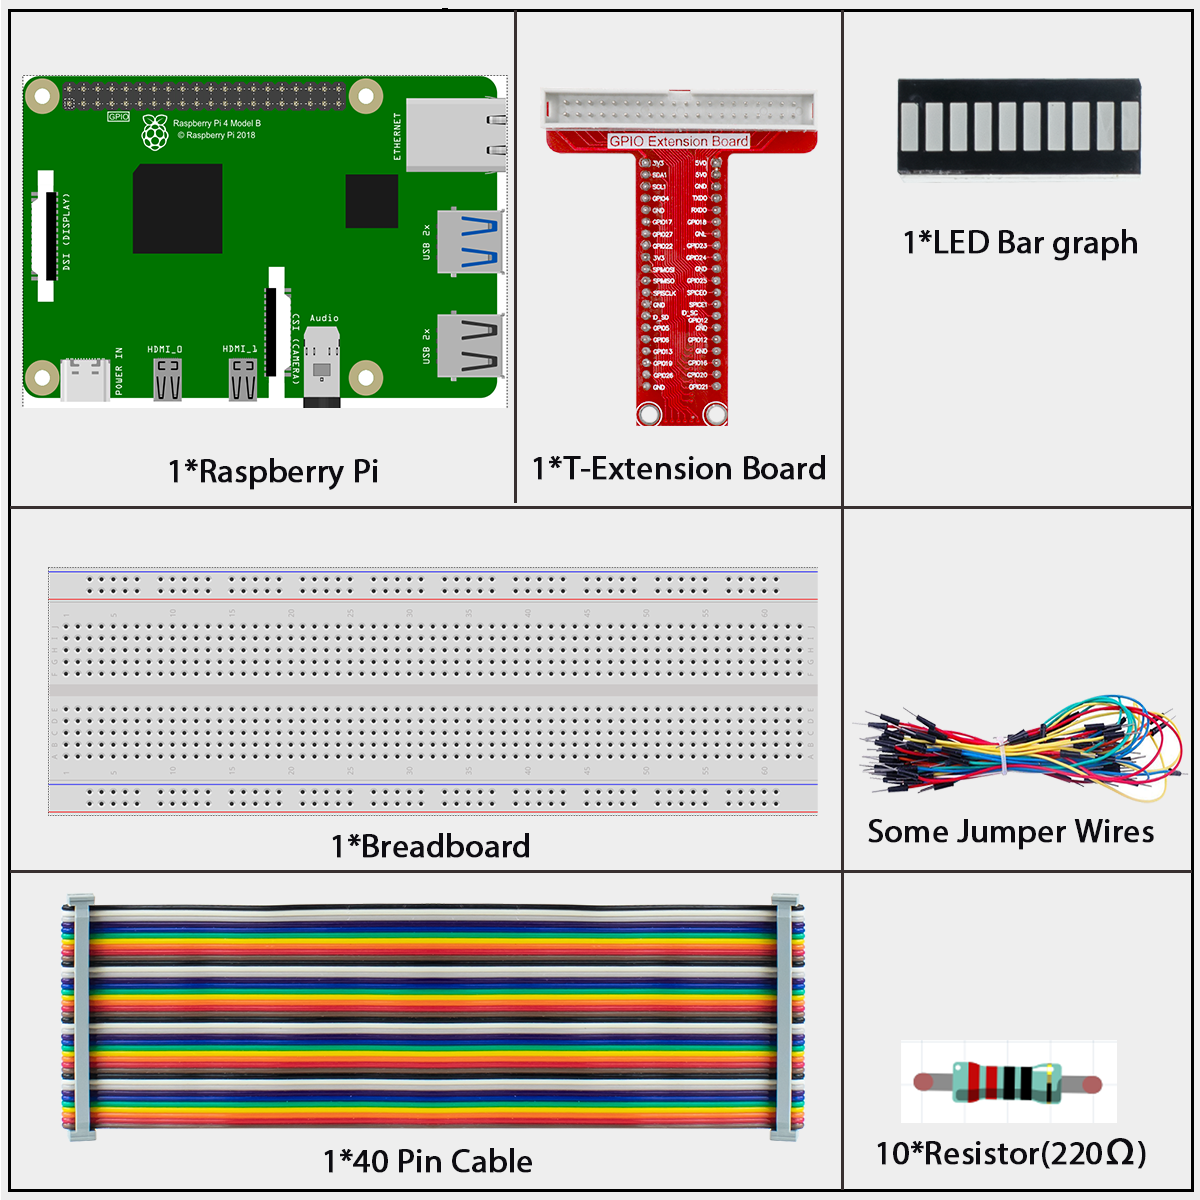
LED Bar Graph
An LED Bar Graph is simply a row of 10 small lights (LEDs) arranged together in one package. Think of it as 10 separate lights that can be controlled individually. It’s perfect for showing levels (like a volume meter or battery indicator) or creating simple animations.
In this project, we’ll connect the LED Bar Graph to our Raspberry Pi and make the lights turn on in sequence - just like a progress bar or a “loading” animation!

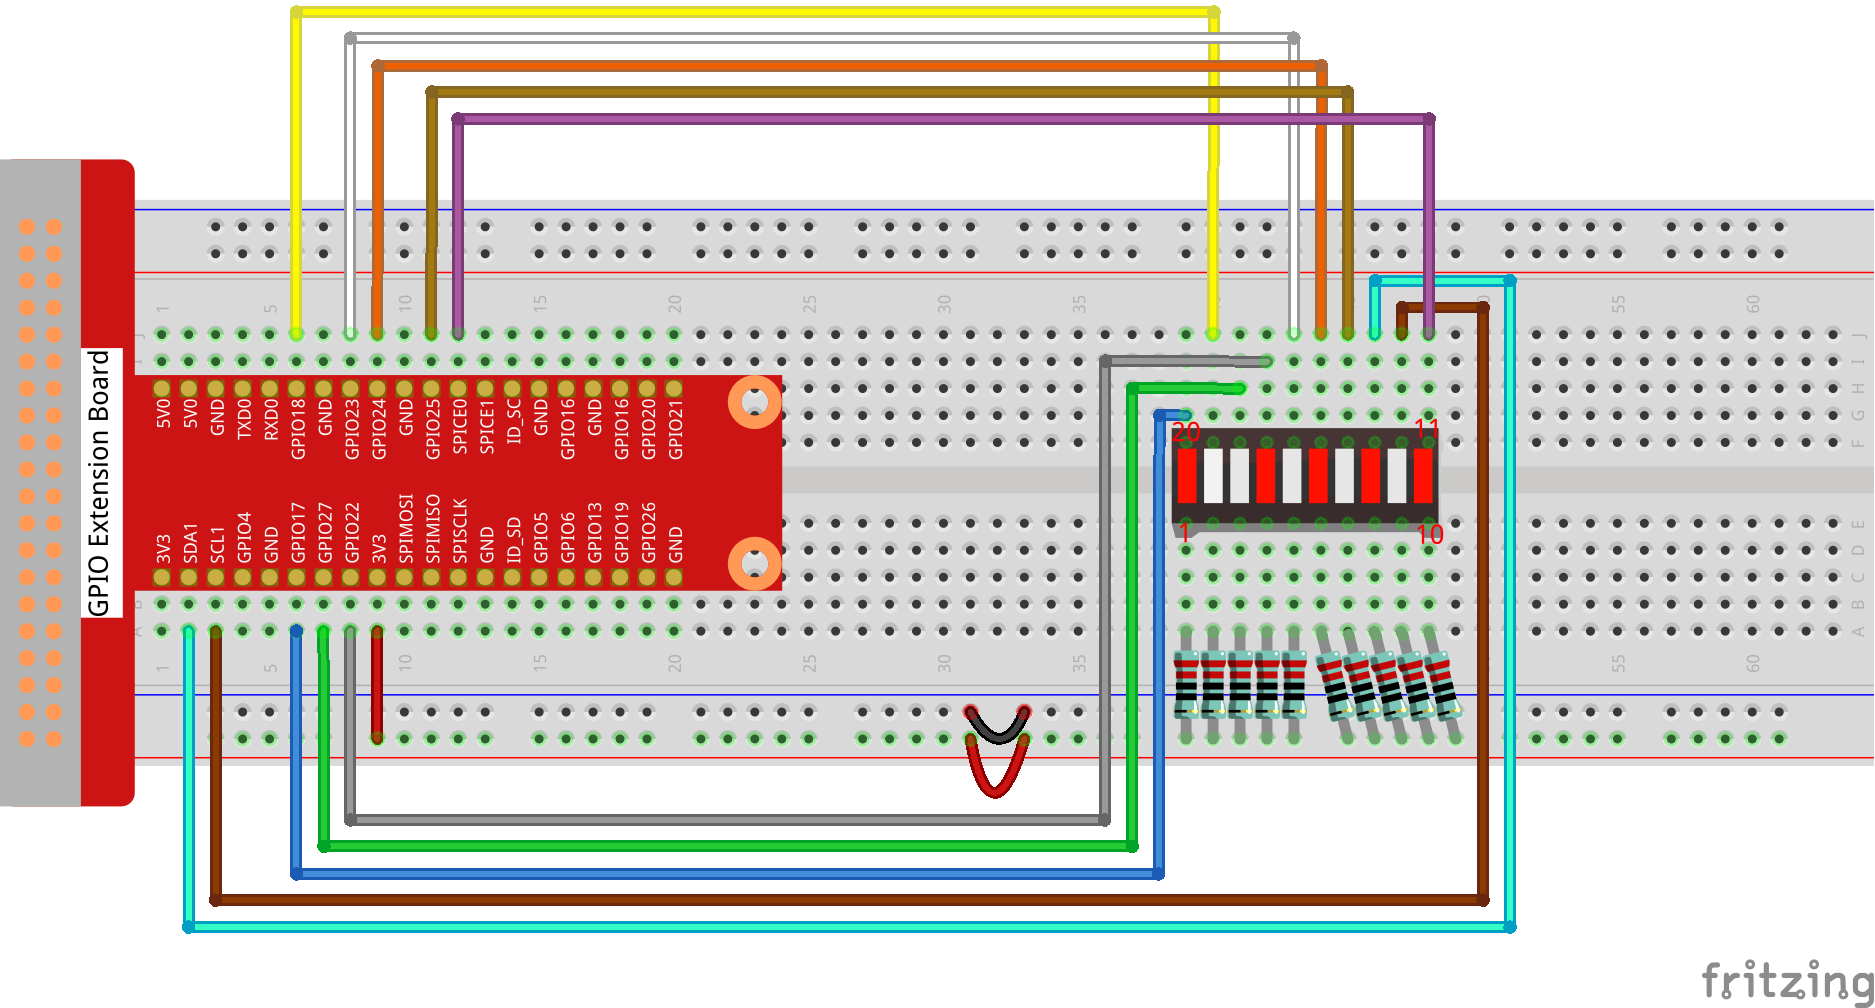
Connect
T-Board Name |
physical |
wiringPi |
BCM |
|---|---|---|---|
GPIO17 |
Pin 11 |
0 |
17 |
GPIO18 |
Pin 12 |
1 |
18 |
GPIO27 |
Pin 13 |
2 |
27 |
GPIO22 |
Pin 15 |
3 |
22 |
GPIO23 |
Pin 16 |
4 |
23 |
GPIO24 |
Pin 18 |
5 |
24 |
GPIO25 |
Pin 22 |
6 |
25 |
SDA1 |
Pin 3 |
8 |
2 |
SCL1 |
Pin 5 |
9 |
3 |
SPICE0 |
Pin 24 |
10 |
8 |
Code
For C Language User
Go to the folder of the code.
cd ~/super-starter-kit-for-raspberry-pi/c/1.3.5/
Compile the code.
gcc 1.3.5_LedBarGraph.c -lwiringPi
Note
When the instruction “gcc” is executed, if “-o” is not called, then the executable file is named “a.out”.
Run the executable file.
sudo ./a.out
After the code runs, you will see the LEDs on the LED bar turn on and off regularly.
This is the complete code
/**
* @file 1.3.5_LedBarGraph.c
* @brief Simple LED Bar Graph Controller
* @description Controls 10 LEDs with different animation patterns
*/

#include <wiringPi.h>
#include <stdio.h>
#include <signal.h>
#include <stdlib.h>

// --- Pin Configuration ---
const int led_pins[10] = {0, 1, 2, 3, 4, 5, 6, 8, 9, 10};

/**
* @brief Initialize LED pins and turn them off
*/
void setup_leds() {
    printf("Setting up LED bar graph...\n");

    for (int i = 0; i < 10; i++) {
        pinMode(led_pins[i], OUTPUT);
        digitalWrite(led_pins[i], HIGH);  // Turn off LEDs (common anode)
    }

    printf("✅ Ready!\n\n");
}

/**
* @brief Light odd LEDs (positions 0,2,4,6,8)
*/
void light_odd_leds() {
    printf("🔸 Odd pattern\n");
    for (int i = 0; i < 10; i += 2) {
        digitalWrite(led_pins[i], LOW);   // Turn ON
        delay(300);
        digitalWrite(led_pins[i], HIGH);  // Turn OFF
    }
}

/**
* @brief Light even LEDs (positions 1,3,5,7,9)
*/
void light_even_leds() {
    printf("🔹 Even pattern\n");
    for (int i = 1; i < 10; i += 2) {
        digitalWrite(led_pins[i], LOW);   // Turn ON
        delay(300);
        digitalWrite(led_pins[i], HIGH);  // Turn OFF
    }
}

/**
* @brief Light all LEDs in sequence
*/
void light_all_leds() {
    printf("🔸 All LEDs\n");
    for (int i = 0; i < 10; i++) {
        digitalWrite(led_pins[i], LOW);   // Turn ON
        delay(300);
        digitalWrite(led_pins[i], HIGH);  // Turn OFF
    }
}

/**
* @brief Clean up and exit when Ctrl+C is pressed
*/
void cleanup_exit(int sig) {
    printf("\n🧹 Turning off LEDs...\n");
    for (int i = 0; i < 10; i++) {
        digitalWrite(led_pins[i], HIGH);  // Turn OFF all LEDs
    }
    printf("✅ Goodbye!\n");
    exit(0);
}

/**
* @brief Main function
*/
int main(void) {
    // Handle Ctrl+C
    signal(SIGINT, cleanup_exit);

    printf("=== LED Bar Graph Controller ===\n");
    printf("Press Ctrl+C to exit\n\n");

    // Initialize wiringPi
    if (wiringPiSetup() == -1) {
        printf("❌ Setup failed!\n");
        return 1;
    }

    // Setup LEDs
    setup_leds();

    // Main loop
    while (1) {
        light_odd_leds();
        delay(300);

        light_even_leds();
        delay(300);

        light_all_leds();
        delay(300);

        printf("--- Cycle complete ---\n\n");
    }

    return 0;
}
For Python Language User
Go to the code folder and run.
cd ~/super-starter-kit-for-raspberry-pi/python
python 1.3.5_LedBarGraph.py
After the code runs, you will see the LEDs on the LED bar turn on and off regularly.
This is the complete code
#!/usr/bin/env python3
"""
1.3.5_LedBarGraph.py

Simple LED Bar Graph Controller
This program controls 10 LEDs with different animation patterns.

Animation patterns:
- Odd LEDs: 0, 2, 4, 6, 8
- Even LEDs: 1, 3, 5, 7, 9
- All LEDs sequence
"""

import RPi.GPIO as GPIO
import time
import signal
import sys

class LedBarGraph:
    """
    A class to control a 10-LED bar graph with various animation patterns.
    """

    def __init__(self):
        """
        Initialize the LED bar graph controller.
        """
        # Pin configuration - these must match your hardware setup
        # Using BCM numbering that corresponds to wiringPi pins 0-10
        self.led_pins = [17, 18, 27, 22, 23, 24, 25, 2, 3, 8]  # BCM pins corresponding to wiringPi 0,1,2,3,4,5,6,8,9,10

        # Setup GPIO and LEDs
        self._setup_gpio()
        self._setup_leds()

        # Setup signal handler for graceful exit
        signal.signal(signal.SIGINT, self._cleanup_exit)

    def _setup_gpio(self):
        """
        Configure GPIO settings.
        """
        GPIO.setmode(GPIO.BCM)  # Use BCM pin numbering
        GPIO.setwarnings(False)  # Disable GPIO warnings

    def _setup_leds(self):
        """
        Initialize LED pins and turn them all off.
        """
        print("🔧 Setting up LED bar graph...")

        for pin in self.led_pins:
            GPIO.setup(pin, GPIO.OUT)
            GPIO.output(pin, GPIO.HIGH)  # Turn off LEDs (assuming common anode setup)

        print("✅ LED setup complete! Ready to start animations.")
        print()

    def light_odd_leds(self):
        """
        Light odd-positioned LEDs (positions 0, 2, 4, 6, 8).
        """
        print("🔸 Lighting odd pattern LEDs...")

        for i in range(0, 10, 2):  # 0, 2, 4, 6, 8
            GPIO.output(self.led_pins[i], GPIO.LOW)   # Turn ON
            time.sleep(0.3)
            GPIO.output(self.led_pins[i], GPIO.HIGH)  # Turn OFF

    def light_even_leds(self):
        """
        Light even-positioned LEDs (positions 1, 3, 5, 7, 9).
        """

        for i in range(1, 10, 2):  # 1, 3, 5, 7, 9
            GPIO.output(self.led_pins[i], GPIO.LOW)   # Turn ON
            time.sleep(0.3)
            GPIO.output(self.led_pins[i], GPIO.HIGH)  # Turn OFF

    def light_all_leds(self):
        """
        Light all LEDs in sequence from 0 to 9.
        """
        print("🔸 Lighting all LEDs in sequence...")

        for i in range(10):
            GPIO.output(self.led_pins[i], GPIO.LOW)   # Turn ON
            time.sleep(0.3)
            GPIO.output(self.led_pins[i], GPIO.HIGH)  # Turn OFF

    def run_animation_cycle(self):
        """
        Run one complete animation cycle with all patterns.
        """
        # Execute animation patterns in sequence
        self.light_odd_leds()
        time.sleep(0.3)

        self.light_even_leds()
        time.sleep(0.3)

        self.light_all_leds()
        time.sleep(0.3)

        print("--- Animation cycle complete ---")
        print()

    def run(self):
        """
        Start the main animation loop.
        """
        print("🚀 Starting LED bar graph animations...")
        print("Press Ctrl+C to stop and exit.")
        print()

        try:
            while True:
                self.run_animation_cycle()

        except KeyboardInterrupt:
            # This should be caught by the signal handler, but just in case
            self._cleanup_exit(None)

    def _cleanup_exit(self, signal_num):
        """
        Clean up GPIO resources and exit gracefully.

        Args:
            signal_num: The signal number (for signal handler compatibility)
        """
        print("\n🧹 Turning off all LEDs...")

        # Turn off all LEDs
        for pin in self.led_pins:
            GPIO.output(pin, GPIO.HIGH)  # Turn OFF

        # Clean up GPIO resources
        GPIO.cleanup()

        print("✅ Cleanup complete. Goodbye!")
        sys.exit(0)

def main():
    """
    Main function to initialize and run the LED bar graph controller.
    """
    print("=" * 40)
    print("=" * 40)
    print("This program controls 10 LEDs with animation patterns.")
    print("=" * 40)
    print()

    try:
        # Create and run the LED controller
        led_controller = LedBarGraph()
        led_controller.run()

    except Exception as e:
        print(f"❌ Error: {e}")
        GPIO.cleanup()
        sys.exit(1)

if __name__ == '__main__':
    # Execute the main function when the script is run directly
    main()
Phenomenon
When you run the program, your LED Bar Graph will create a light show with three different patterns:
Odd Pattern: LEDs at positions 0, 2, 4, 6, and 8 will light up one after another
Even Pattern: LEDs at positions 1, 3, 5, 7, and 9 will light up one after another
Sequential Pattern: All LEDs will light up in order from left to right
The animation below shows what you should see: